
Start-Up and Shut-Down
Like any computer, MiRo needs a little time to startup, and a little time to shutdown safely. Please do not turn MiRo on and off in quick succession, therefore.
Please read all of this page carefully before powering your MiRo for the first time. It is possible, if unlikely, to damage the software installation on MiRo's SD card by interrupting the boot or shutdown processes, so please always wait for each process to complete, as described below, before operating the switch again.

Connecting the battery
Your robot arrives with the battery pack installed but not connected. To connect it (or to change the batteries), follow the instructions below.
Ensure that MiRo is turned off.
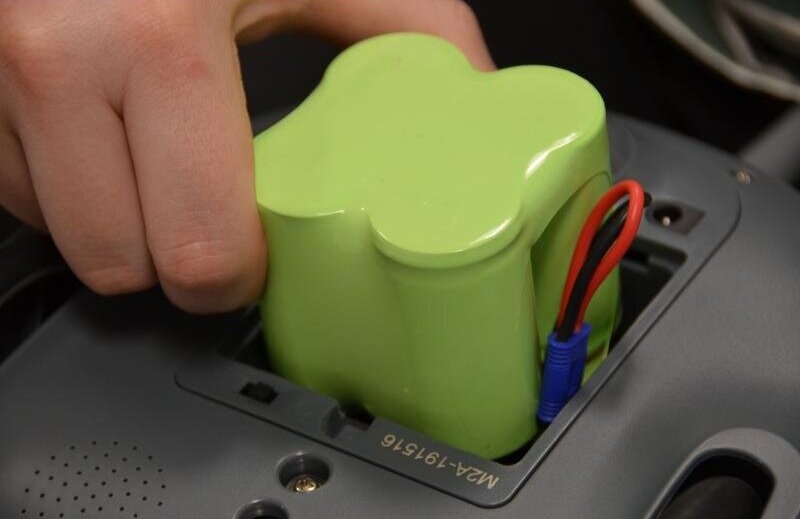
Turn MiRo upside-down and support it securely by resting the body shell (and only the body shell) on something soft—see image for one solution.
Remove the single screw securing the battery cover and remove the cover.
Extract the battery pack from the robot.
Find the battery pack connector and the connector inside the battery case, and plug them together.
Refit the battery pack, ensuring that the cable is not fouled (it will fit tidily in one corner).
Refit the cover and secure it with the screw.
Disconnection is the reverse of connection.


Charging
Charging may be hazardous if performed incorrectly—please ensure you have read all the safety information in the Owner's Guide before charging the battery.
To charge the installed battery pack, plug the charger cable into the socket underneath the robot, and into a power socket. The charging light will glow red if the battery is charging, and will switch to green once it is fully charged.
Alternatively, you can charge a battery pack "off robot", using the included adapter cable. This will be useful if you have two battery packs and wish to continue using the robot whilst the second battery pack is recharging.
Please ensure that your MiRo is fully charged before first use—in future uses, you can charge or operate your MiRo in any way you choose.
Do not plug in the charger when the robot is turned on (any lights are illuminated) since this will cut the power to the robot. Shut the robot down first.
Battery low
If MiRo's batteries are getting low, you will hear something that sounds a bit like a satellite from the 1970s. This is MiRo's battery-low warning, and you should turn the robot off immediately and recharge the batteries before proceeding.
Do not ignore the low battery alarm—the NiMH batteries may be damaged if they are drained beyond this point.
Turn on
With a charged battery installed, turn on your MiRo at the switch underneath.
Both red and blue lights on the left side of the body shell flicker together for two seconds—this is the Emergency power off window (see below).
The red light stops flashing and remains lit and the blue light flashes slowly, indicating that the on-board computer is booting.
When booting is complete, the blue light will stop flashing and remain lit.
Your robot will then start Bluetooth services and connect to the wireless network (if it has credentials to do so).
System updates are run at this stage and may take some time (see below).
You can now connect to the robot using MiRoapp, or through the network interface if it is connected.
Finally, any application software is started.
Do not turn on the power switch unless all lights are extinguished.Do not turn off the power switch unless the blue power state light is lit steadily.

System updates
System updates are run after the blue light has stopped flashing, but before application software is started:
System updates are scheduled by the "System update schedule"—it is up to you whether to update your robot regularly, or to perform updates manually as required (by running a Software update).
If an update is scheduled, but no updates are needed, application start-up will typically be delayed only for a few seconds.
If the robot software is sufficiently recent, a soothing melody will play to indicate that updates are underway.
If there are updates pending, the procedure may take several minutes, depending on network conditions—please be patient and wait for it to complete.
Please do NOT turn MiRo off whilst the blue light is flashing, except in an emergency. If the update procedure continues for a very long time (more than ten minutes) it is worth trying to SSH login and examine the log at /tmp/miro2/log/on_system_ready in case something has gone wrong.
Turn off
Turn off MiRo at the switch underneath.
The red light under the left flank will go out immediately.
The blue light will flicker briefly three times, as the computer waits to see if the switch will be turned back on.
If the switch remains off, the blue light will continue flickering for two seconds and then return to flashing slowly, indicating that the computer is shutting down.
When shut down completes, the blue light will flicker again for five seconds and then go out, indicating that power has now been turned off.
It is now safe to restart your robot, remove the batteries, or open it up for maintenance.
Do not turn on the power switch unless all lights are extinguished. Do not turn off the power switch unless the blue power state light is lit steadily.
Embedded reset
The on-board computer does not commence a shutdown until the power switch has been OFF for three seconds (see above). Whilst the power switch is OFF, the embedded computers are powered down.
Thus, you can reset the robot's embedded systems, without shutting down the main computer, by moving the switch through the sequence ON→OFF→ON within three seconds. This technique can be used to clear a crashed firmware state if this occurs (if this occurs regularly, however, something is wrong).
Do not repeat this sequence within three seconds—if you do so, you will trigger "Emergency power off", described below, and de-power the main computer without warning.
Emergency power off
In an emergency, power can be withdrawn immediately by triggering the emergency power off function. Power will be withdrawn immediately at any time that the power switch is moved through the sequence OFF→ON→OFF within two seconds.
In normal operation, you will move the power switch OFF→ON to turn on the robot. The power circuit then enters the two second emergency power off window, which is indicated by both blue and red main LEDs flickering in unison. If the power switch is moved ON→OFF during this window, power is withdrawn immediately. After two seconds, the window has passed, the indicator LEDs and the power circuit return to their normal behaviour, and the system continues to start (on-board computer boots).
From this point forward, to withdraw power immediately, you must perform the sequence ON→OFF→ON→OFF, so this is the sequence you would need to use in an emergency. Essentially: operate the switch three times to withdraw power immediately.
You are advised to practice the emergency power off sequence in advance of any emergency. In order to do this without risk of data corruption you have the option of first removing the SD card from the on-board computer. Triggering emergency power off will withdraw power from the on-board computer without warning which may lead to corruption of the SD card.
In an emergency, the power will usually be ON. Therefore, to withdraw power quickly, you will perform the sequence ON→OFF→ON→OFF (three switch operations) in quick succession.
Avoid triggering this behaviour in normal use since de-powering the main computer without warning can lead to data corruption. As indicated above, do not cycle the main power switch rapidly unless you intend either an embedded reset or an emergency power off.
Shutdown timeout
If all is well, the power system will detect when the switch underneath is turned to OFF, and will begin to shutdown the on-board computer. If something is amiss with the system, the switch may be ignored, and shutdown will not occur. In this case, the blue light will remain lit steadily when the red light goes out with the switch.
Power will be automatically withdrawn if the switch is left in the OFF position for two minutes and shutdown has not completed. This carries a small risk of data loss. Therefore, if your robot does not respond to being switched OFF and you want to ensure that the data on-board is safe, you should use the SSH interface to login and command a shutdown manually (usually, mm shutdown, or use sudo shutdown -h now as an equivalent).